Introduction
The builder pattern is a creational design pattern, i.e. it is a pattern for creating or instantiating objects of classes. It is used for breaking down the construction process into smaller, more manageable and testable steps.
In Rust we can use structs and traits to implement this pattern.
What does it look like?
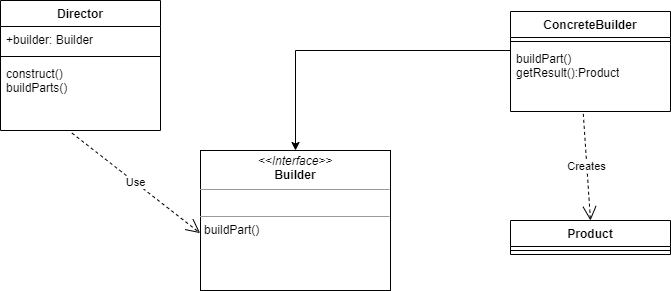
The basic builder pattern looks like this:

Let’s break this down into its parts:
- The Director. This is the client class for the Builder, and it requests some product to be built.
- The Builder interface. This is the generic interface for any Builder, and it contains the methods to build a Product.
- The ConcreteBuilder. This is the concrete class where the Product gets built. Because we can only use an interface, ConcreteBuilders can be swapped in and out to build different products.
- The product we want to build is the Product class. This could also define an interface.
Implementing the building pattern in Rust
Open your terminal or commandline in an empty directory, and type:
cargo new rust_builderNow open the newly created directory in your IDE and go to main.rs
We will start by defining the Bicycle struct:
#[derive(Clone,Debug)]
pub struct Bicycle {
    number_of_wheels: i8,
    bike_type: String
}

impl Bicycle {
    fn new()->Self {
        Bicycle { number_of_wheels: 0, bike_type: "".to_string() }
     }

}
A short breakdown:
- Our Bicycle struct has just two fields: number_of_wheels and bike_type
- We define a constructor for the Bicycle with empty values.
- The Bicycle struct gets two traits: Clone, so we can return a clone from the builder and Debug so we can print out a userfriendly string. Since both i8 and String support the Clone trait, no special implementation is needed.
Now it is time to define the BicycleBuilder trait:
pub trait BicycleBuilder {
    fn add_wheels(&mut self)->&mut dyn BicycleBuilder;
    fn set_type(&mut self)->&mut dyn BicycleBuilder;
    fn build(&self) -> Bicycle;
}
A short breakdown:
- The trait has three methods: add_wheels to set the number of wheels, set_type to set the bike type, and a build method which will return a finished product.
- add_wheels and set_type take a mutable self as parameter, since they change the bicycle field.
- Since build only returns a clone, no mutability is needed nor desired.
- The methods add_wheels and set_type return pointer to a dyn BicycleBuilder. That is because BicycleBuilder is a trait, and we need dynamic dispatching.
Now for the implementation of the builder pattern:
struct ATBBuilder {
    bicycle: Bicycle
}

impl BicycleBuilder for ATBBuilder {
    fn add_wheels(&mut self) -> &mut dyn BicycleBuilder {
        self.bicycle.number_of_wheels=2;
        self
    }

    fn set_type(&mut self) -> &mut dyn BicycleBuilder {
        self.bicycle.bike_type="ATB".to_string();
        self
    }

    fn build(&self)->Bicycle {
        self.bicycle.clone()
    }

}
Short comments:
- ATBBuilder holds a reference to the product to be produced, i.e. a Bicycle
- The implementation is quite straightforward. All methods return self so they can be chaincalled.
- The build method returns a clone
- Note that a statement on its own, like ‘self‘ without a semicolon works like a return statement in Rust.
For good measure, we can also introduce a StreetBikeBuilder:
struct StreetBikeBuilder {
    bicycle:Bicycle
}

impl BicycleBuilder for StreetBikeBuilder {
    fn add_wheels(&mut self) -> &mut dyn BicycleBuilder {
        self.bicycle.number_of_wheels=3;
        self
    }

    fn set_type(&mut self) -> &mut dyn BicycleBuilder {
        self.bicycle.bike_type="Street".to_string();
        self
    }

    fn build(&self)->Bicycle {
        self.bicycle.clone()
    }

}
All we need now is an engineer to put it all together:
struct BikeEngineer {
    builder: Box<dyn BicycleBuilder>
}

impl BikeEngineer {
    fn new(builder: Box<dyn BicycleBuilder>)->Self {
        BikeEngineer { builder: builder }
    }
    fn construct_bike(&mut self)->Bicycle {
        self.builder
        .add_wheels()
        .set_type()
        .build()

    }


}
Some notes:
- We have Box<dyn BicycleBuilder> as the type of the builder. This is because we need a. dynamic dispatching and b. we do not know the size of the BicycleBuilder class at compile time, that is why we need a box.
- We define a constructor that takes such a box, and assigns it to the builder field. Also note that we return Self. Self refers to the implementing type. More information can be found here.
- The construct_bike method just adds the wheels, sets the type and returns the finished product.
Now, put our code to the test:
fn main() {
    let builder=Box::new(StreetBikeBuilder{bicycle:Bicycle::new()});
    let mut engineer=BikeEngineer::new(builder);

    let bike=engineer.construct_bike();
    println!("{:?}",bike);
}
Again line by line:
- First we instantiate a builder, in this case a StreetBikeBuilder
- We construct an engineer object, and pass it our builder.
- The bike is now constructed.
- And we print the result. ‘{:?}’ prints out the contents of a struct.
Try and experiment with this.
Conclusion
This was an interesting experience, and while doing it and trying to get it right, I learned a lot about Rust, although I must say I shot myself in the foot several times. On the other hand, the code is clear, and easy to read.


