Introduction
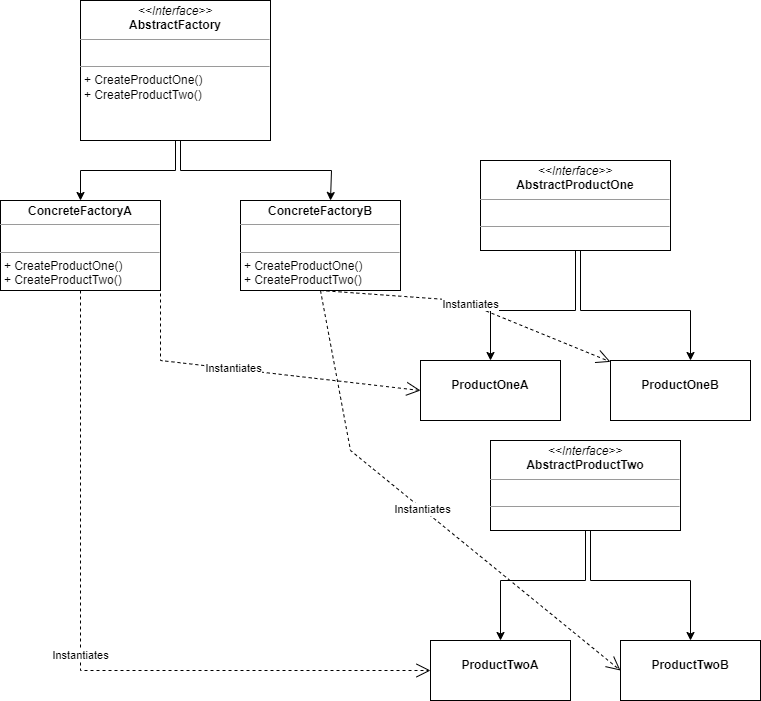
The Abstract Factory Pattern is a way to group the creation of related objects, like products of a certain brand or make by building a common factory interface. If this all sounds abstract, a picture can help:

A short breakdown:
- All the factories have a common interface called AbstractFactory
- The concrete factories, in our diagram there are two, implement this interface
- These concrete factories produce objects with a common interface so those are interchangeable. In our example those are called AbstractProductOne and AbstractProductTwo
This is a somewhat more complicated design pattern, but when used well can lead to interchangeable concrete implementations. However, considering the relative complexity of this pattern, it will require extra initial work. Also, due to the high abstraction levels, it can lead in some cases to code that is more difficult to test, debug and maintain.
So, even though this pattern is very flexible and powerful, use it wisely and sparingly.
Implementation in Rust
We start by defining two interfaces: AbstractCar and AbstractBike:
trait AbstractCar {
    fn description(&self)->String;
}

trait AbstractBike {
    fn description(&self)->String;
}
Both interfaces simply define a description() method which renders a string representation of either a car or a bike.
We need to be able to make these vehicles, and that is why we need a VehicleFactory interface:
trait VehicleFactory {
    fn create_car(&self,color:String)->Box<dyn AbstractCar>;
    fn create_bike(&self,number_of_wheels:i8)->Box<dyn AbstractBike>;
}
Two methods, one to produce an AbstractCar, the other to produce an AbstractBike
Next we will define the concrete implementation of a car, a VolkswagenCar:
struct VolksWagenCar {
    make: String,
    color: String,
}

impl VolksWagenCar {
    fn new(color:String)->Self {
        VolksWagenCar {
            color,
            make: "Volkswagen".to_string()
        }
    }
}

impl AbstractCar for VolksWagenCar {
    fn description(&self) -> String {
        format!("make: {}, color: {}",self.make,self.color)
    }
}
Some notes:
- A VolkswagenCar has two properties: a make, and a color. This is a very simple example of course.
- We define a new method on the class, which returns a new VolkswagenCar struct, where the make is of course ‘Volkswagen’ and the color can be decided by the client.
- The implementation of the AbstractCar interface is fairly straightforward, it simple returns a string representation of the car.
The VolkswageBike struct is very similar, only on a bike you can decide on the number of wheels:
struct VolkswagenBike {
    make: String,
    number_of_wheels: i8
}

impl VolkswagenBike {
    fn new(number_of_wheels: i8)->Self {
        VolkswagenBike {
            number_of_wheels,
            make: "Volkswagen".to_string()
        }
    }
}

impl AbstractBike for VolkswagenBike {
    fn description(&self) -> String {
        format!("make: {}, number of wheels: {}",self.make,self.number_of_wheels)
    }
}
As you may have been expecting, the RenaultCar and the RenaultBike are implemented in a similar fashion:
struct RenaultCar {
    make: String,
    color: String,
}

impl RenaultCar {
    fn new(color:String)->Self {
        RenaultCar {
            color,
            make: "Renault".to_string()
        }
    }
}

impl AbstractCar for RenaultCar {
    fn description(&self) -> String {
        format!("make: {}, color: {}",self.make,self.color)
    }
}

struct RenaultBike {
    make: String,
    number_of_wheels: i8
}

impl RenaultBike {
    fn new(number_of_wheels: i8)->Self {
        RenaultBike {
            number_of_wheels,
            make: "Volkswagen".to_string()
        }
    }
}

impl AbstractBike for RenaultBike {
    fn description(&self) -> String {
        format!("make: {}, number of wheels: {}",self.make,self.number_of_wheels)
    }
}
Now we come to the heart of the pattern, the factories. We start with the VolkswagenFactory:
struct VolkswagenFactory;

impl VehicleFactory for VolkswagenFactory {
    fn create_car(&self,color: String) -> Box<dyn AbstractCar> {
        Box::new(VolksWagenCar::new(color))
    }

    fn create_bike(&self,number_of_wheels: i8) -> Box<dyn AbstractBike> {
        Box::new(VolkswagenBike::new(number_of_wheels))
    }
}
Some notes:
- The create methods return a Box around a trait object. This is because the size of the return object is not known beforehand.
- The first argument in both methods is &self and not &mut self as you may have expected: neither method changes the internal state of the struct
Again, the RenaulFactory is very similar:
struct RenaultFactory;

impl VehicleFactory for RenaultFactory {
    fn create_car(&self,color: String) -> Box<dyn AbstractCar> {
        Box::new(RenaultCar::new(color))
    }

    fn create_bike(&self,number_of_wheels: i8) -> Box<dyn AbstractBike> {
        Box::new(RenaultBike::new(number_of_wheels))
    }
}
Time to test
Now we can add the main function to our little app:
fn main() {
    let factory=VolkswagenFactory{};
    let car=factory.create_car("Red".to_string());
    let description=car.description();
    println!("{}",description);
}
Line by line:
- We construct or instantiate a VolkswagenFactory struct
- We create an AbstractCar object from that
- Next we ask its description and print it out
You can see how flexible the pattern is, by changing to RenaultFactory struct, and the code will still work.
Conclusion
As you can see, setting up the factory is quite some work even in a simple case like this one. However you gain a lot of flexibility and ease of use.
Mind you, as I said in the introduction, because of the higher level of abstraction, using this pattern can lead to extra initial work, and in some case, code that is harder to debug and maintain.
When done well, this pattern offers flexibility, even at runtime, and maintainability.


