Introduction
For the past year I have been experimenting with Rust. So, now it is time for a simple real project.
What will be build?
In this short series we will build a simple REST API to administer events. Events in this case means things like parties, festivals, or maybe even concerts. An event, in this very simplified view, consists of the following:
- Name
- Description
- Location
Prerequisites
For this you will obviously need some previous knowledge of Rust and also:
- A working rust environment. Instruction on how to set that up can be found on this page.
- Have Postgres installed or have access to a postgres instance
- Have an IDE installed. For Rust development, I generally use Visual Studio Code with the Rust plugin or IntelliJ
- Optionally, you might want to install pgAdmin
The full source code can be found on my github.
Getting started
First we need to install the diesel_cli:
cargo install diesel_cli --no-default-features --features postgresAfter having done that we can start our project:
cargo new events_api
cd events_api
cargo add actix-web
cargo add serde -F derive
cargo add diesel -F postgres -F r2d2 -F chrono -F uuid
cargo add dotenv
cargo add env_logger
cargo add r2d2
cargo add uuid -F v4
cargo add chrono -F serde
cargo add diesel_migrations -F postgres
You have now imported the packages we need.
The Database
Now add a .env file in your main directory, and fill it with:
DATABASE_URL=postgres://username:password@localhost/databasenameNow fill your username, password, when not running locally, the host and the databasename.
Make sure everything is saved and type:
diesel setupAfter this is done type:
diesel migration generate create_eventsThis will create a new folder called something like ‘<date>-create_events’. In it you will find two sql-files: ‘up.sql’ and ‘down.sql’. In the ‘up.sql’ put:
CREATE TABLE events (
    id SERIAL PRIMARY KEY,
    name TEXT NOT NULL,
    description TEXT NOT NULL,
    location TEXT NOT NULL
);
And in the down.sql put:
DROP TABLE events;
Now type:
diesel migration runIf you look in your database, you will see that an ‘events’ table has been created, with the appropiate columns.
Also a schema.rs file has been created. Create a ‘models’ directory in your src/ directory and move this ‘schema.rs’ file into that directory.
Also edit the Diesel.toml file in the root directory of your application to read:
[print_schema]
file = "src/models/schema.rs"
custom_type_derives = ["diesel::query_builder::QueryId"]

[migrations_directory]
dir = "migrations"
Models
In your src/ directory create a directory ‘models’ and in that directory create a file ‘event.rs’ to read:
use serde::{Deserialize, Serialize};
use diesel::{Queryable, Insertable,AsChangeset};

#[derive(Queryable, Serialize, Deserialize,Debug,Clone,AsChangeset,Insertable)]
#[diesel(table_name=crate::models::schema::events)]
pub struct Event {
    pub id: i32,
    pub name: String,
    pub description: String,
    pub location: String,
}

#[derive(Deserialize, Serialize,Debug,Clone,Insertable)]
#[diesel(table_name=crate::models::schema::events)]
pub struct NewEvent {
    pub name: String,
    pub description: String,
    pub location: String,
}
A short explanation:
- The first struct is the basic model, it is queryable, serializable and deserializable, which comes in handy if you are developing a REST API
- Next we define a somewhat smaller struct to insert a new product.
- We do not need to query this, but we need to insert this, hence the Insertable attribute.
- Because we do not know in advance the id of the event, we omit the id field.
- Also we specify the table in which to insert this thing
Also in the ‘models’ folder create a ‘mod.rs’ file:
pub mod event;
pub mod schema;
Database implementation
In your src/ directory create a directory named ‘repository’, and in this directory a file ‘database.rs’. This file will contain our database operations. As usual we will start with the prelimianaries:
use diesel::prelude::*;
use diesel::r2d2::{self, ConnectionManager};
use dotenv::dotenv;


use crate::models::event::{Event,NewEvent};
use crate::models::schema::events::dsl::*;
Next we define a type for the pool as a kind of shorthand:
pub type DBPool = r2d2::Pool<ConnectionManager<PgConnection>>;
Next we define a Database struct. This is not strictly necessary, but this make it possible to define methods on the struct:
pub struct Database {
    pub pool: DBPool,
}
All this does is define a struct with one field of type DBPool.
The Database implementation
Now we can define the methods:
impl Database {
    pub fn new() -> Self {
        dotenv().ok();
        let database_url = std::env::var("DATABASE_URL").expect("DATABASE_URL must be set");

        let manager = ConnectionManager::<PgConnection>::new(database_url);
        let result = r2d2::Pool::builder()
            .build(manager)
            .expect("Failed to create pool.");

        Database { pool: result }
    }

    pub fn get_events(&self) -> Vec<Event> {

        events
            .load::<Event>(&mut self.pool.get().unwrap())
            .expect("Failed to get events.")
    }

    pub fn get_event(&self, find_id:i32) -> Option<Event> {
        events
            .find(find_id)
            .first::<Event>(&mut self.pool.get().unwrap())
            .ok()
    }

    pub fn create_event(&self,event:NewEvent)->Result<Event,diesel::result::Error>{

        diesel::insert_into(events).values(&event).get_result(&mut self.pool.get().unwrap())
    }

    pub fn delete_event(&self,find_id:i32)->Result<usize,diesel::result::Error>{
        diesel::delete(events.filter(id.eq(find_id))).execute(&mut self.pool.get().unwrap())
    }

    pub fn update_event(&self,event:Event)->Result<Event,diesel::result::Error>{
        diesel::update(events.filter(id.eq(event.id))).set(&event).get_result(&mut self.pool.get().unwrap())
    }
}
Since this is quite a lot of code, some explanation is needed:
- The new method is the constructor return Self. In it we build a databasepool using diesel and r2d2. The connection is based on the environment variable DATABASE_URL. If this variable is not set, then the method will fail.
- In the get_events method we use the events table to load all events. The load event takes a generic parameter, <Event>, which defines the return type. In case there is a problem with the connection, of if the mapping fails, the whole method will with a message.
- The get_event method takes an id as its parameter, and uses the find method of the events table (which is defined in the schema.rs file)
- The create_event method takes a NewEvent as its parameter. This is the same as an Event structure, only the id field is omitted, since that is returned by the database. If something goes wrong, an error is returned. The method has a return type of Result<Event,diesel::result::Error> so we can check if the operation went well and take action if it did not.
- The delete_event takes an id as its parameter, the id of the event we want to delete. Again we return a Result type, this time Result<usize,diesel::result::error>, in case we want to check if the deletion succeeded
- Finally we have the update_event method which follows the same pattern, this time we have an Event (that is an Event with an id) to be updated. This one returns Result<Event,diesel::result::Error> which returns the updated event, and an error if something went wrong.
Also in the repository directory add a ‘mod.rs’ file:
pub mod database;
That is the database out of the way, for now at least.
The Web API
In the root directory add a ‘handlers’ directory, and in that directory create a file called ‘handlers.rs’
First the preliminaries:
use actix_web::{web,get,post,delete,put,HttpResponse};
use crate::{models::event::{Event,NewEvent},repository::database::Database};
We are using Actix as our web framework, and we need several structs and attributes from that framework, also we need our own types, and the database.
Our first method:
#[get("/events")]
async fn get_events(db:web::Data<Database>)->HttpResponse{
    let events = db.get_events();
    HttpResponse::Ok().json(events)
}
Some explanation is needed:
- We inject the web::Data<Database> as a parameter, documentation can be found here. This is application (root) data, which is defined at the startup of the application
- Next we query the database for the events, and return a response.
- The attribute #[get(“/events”)] defines the route and http-verb (GET in this case).
Next we will define a method with route parameters:
#[get("/events/{id}")]
async fn get_event(db:web::Data<Database>,path:web::Path<i32>)->HttpResponse{
    let event = db.get_event(path.into_inner());
    match event {
        Some(event)=>HttpResponse::Ok().json(event),
        None=>HttpResponse::NotFound().body("Not Found")
    }
}
Line by line:
- This method uses the GET verb, and has a route parameter {id} and returns a HttpResponse
- Just like the previous method, the Database is injected, and we get a path parameter, which contains just an i32.
- Next we try to get the event with the specified id. The into_inner method is used to unwrap the id, since it is wrapped in the Path structure.
- Next we use Rust’s powerful match-statement. In case an event was found, we return the event, otherwise a 404 is returned.
The remaining two methods use more or less the same pattern. Mind the different HTTP-verbs. Here is the code:
#[delete("/events/{id}")]
async fn delete_event(db:web::Data<Database>,path:web::Path<i32>)->HttpResponse{
    let event = db.delete_event(path.into_inner());
    match event {
        Ok(event)=>HttpResponse::Ok().json(event),
        Err(_)=>HttpResponse::InternalServerError().body("Internal Server Error")
    }
}

#[put("/events")]
async fn update_event(db:web::Data<Database>,event:web::Json<Event>)->HttpResponse{
    let event = db.update_event(event.into_inner());
    match event {
        Ok(event)=>HttpResponse::Ok().json(event),
        Err(_)=>HttpResponse::InternalServerError().body("Internal Server Error")
    }
}

#[post("/events")]
async fn create_event(db:web::Data<Database>,event:web::Json<NewEvent>)->HttpResponse{
    let event = db.create_event(event.into_inner());
    match event {
        Ok(event)=>HttpResponse::Ok().json(event),
        Err(_)=>HttpResponse::InternalServerError().body("Internal Server Error")
    }
}
Next we add an init_routes, which modifies a ServiceConfig by adding the routes, called services here:
pub fn init_routes(cfg:&mut web::ServiceConfig){
    cfg.service(
        web::scope("/api")
            .service(get_events)
            .service(get_event)
            .service(create_event)
            .service(delete_event)
            .service(update_event)
    );
}
Note that since we change the ServiceConfig, it has to be mutable. In the handlers directory, also put a ‘mod.rs’ file:
pub mod handlers;Putting it together
Now it is time to put it all together in main.rs. First the preliminaries:
use actix_web::{get, web, App, HttpResponse, HttpServer, Responder, Result};
use env_logger::Env;
use serde::Serialize;
use diesel_migrations::{EmbeddedMigrations, MigrationHarness};
#[macro_use]
extern crate diesel_migrations;


mod handlers;
mod models;
mod repository;
Here just import the needed libraries, like serde, diesel_migrations, but also the modules we have just defined.
Next we define our own Response object:
#[derive(Serialize)]
pub struct Response {
    status: String,
    message: String,
}
Automated migrations
In Diesel we can of course run migrations by hand. However, when deploying through a CI/CD pipeline for example, it is better to automate this. This is also possible in Diesel. Start by defining the following:
type DB=diesel::pg::Pg;
const MIGRATIONS:EmbeddedMigrations=embed_migrations!();
We define the database type. The embed_migrations! macro returns an EmbeddedMigrations object, which contains a list of migrations.
Next define this function:
fn run_migrations(connection: &mut impl MigrationHarness<DB>) {
    let _=connection.run_pending_migrations(MIGRATIONS);
}
Here we run the actual migrations. Mind you: the database you must create the database yourself, migrations just create the tables.
Utility methods
Define the following methods:
#[get("/health")]
async fn health() -> impl Responder {
    HttpResponse::Ok().json(Response {
        status: "ok".to_string(),
        message: "Server is running".to_string(),
    })
}

async fn not_found_error() -> Result<HttpResponse> {
    Ok(HttpResponse::NotFound().json(Response {
        status: "error".to_string(),
        message: "Not Found".to_string(),
    }))
}
Some notes:
- The health method is a kind of healthprobe for something like a Kubernetes cluster
- The not_found_error method is the default method, if no route matches.
The main method
Finally we can put it all together in the main method:
#[actix_web::main]
async fn main() -> std::io::Result<()> {

    let events_db = repository::database::Database::new();
    run_migrations(&mut events_db.pool.get().unwrap());
    let app_data = web::Data::new(events_db);


       env_logger::Builder::from_env(Env::default().default_filter_or("info")).init();
    HttpServer::new(move || {
        App::new()
            .app_data(app_data.clone())
            .configure(handlers::handlers::init_routes)
            .service(health)
            .default_service(web::route().to(not_found_error))
            .wrap(actix_web::middleware::Logger::default())

    })
    .bind(("0.0.0.0", 8080))?
    .run()
    .await
}
Again some notes:
- We instantiate our Database structure, and use its connection to run the migration.
- Then we define the app_data for this app, which just consists of the database.
- Since we want to see something in the console, we setup env_logger.
Now the time has come to set up the real Actix app:
- We inject our app_data, and setup the routes
- We also add the health service.
- And the default_service, in case no route matches.
- And we use the default logger.
We bind all this to address 0.0.0.0 which is our local machine on port 8080, run the app and await.
Important note to Windows 10 and Windows 11 users.
If you are using Windows 10 or Windows 11 running this program might end in exit code. This has to do, as far as I understand it, with a multithreading error in one of the libraries. The solution is quite simple but not straightforward, you can find it on this github page. I hope the maintainers of these libraries will update these soon.
I am not aware of problems on Linux or Mac OS X.
Running it
Now in your terminal type:
cargo runIf things go right you will see something like this:
[2023-08-26T13:47:11Z INFO  actix_server::builder] starting 4 workers
[2023-08-26T13:47:11Z INFO  actix_server::server] Actix runtime found; starting in Actix runtime
If you have Postman use the URL:
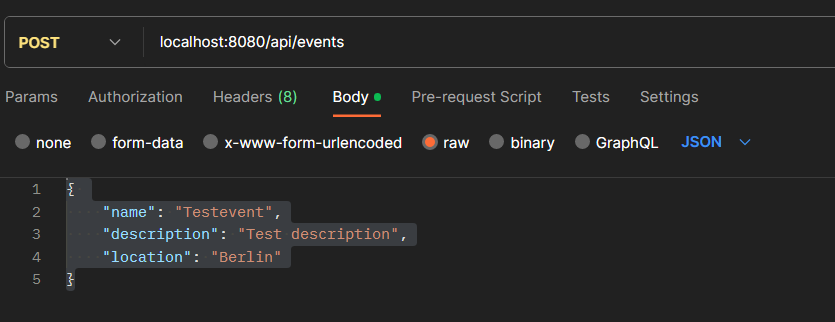
http://localhost:8080/api/eventsAnd you will see an empty array. Since this is not very interesting, try POST-ing this in Postman:
{
    "name": "Testevent",
    "description": "Test description",
    "location": "Berlin"
}
Make sure you have JSON as content-type and ‘raw’ selected:
Now try the first URL again, and you should see some results.
Conclusion
To be honest, writing this API took me quite some time (several weeks off and on). This may be due to Rust, it may be due to my relative inexperience with Rust. However, I succeeded.
The main difficulties for me were:
- The module system, so far I hadn’t really used and I found Rust’s system quite idiosyncratic to be honest
- Getting the automigrations right, which of course in the end turns out to be quite easy.
The automigrations were important since I want to deploy this app to a Kubernetes cluster, but that will have to wait for my next post. Hope you enjoyed it.