Introduction
In this post I described how to build a simple Web API in Rust with Actix, Diesel, and Postgres. Now it is time to deploy this app.
Prerequisites
In order to follow along, you will need the following:
- Docker desktop, we need this in order to build a Docker image
- A Docker hub account, because we will push our image to the hub
- If you want to experiment with Kubernetes locally, Minikube is a good choice to install.
- The code from my previous post, which can be found here.
- An editor like Visual Studio Code works very well for projects like these.
Building the Dockerfile
If we want to deploy our app to Kubernetes, we need to ‘dockerize’ it first, by using a dockerfile. If you have the solution from my previous post open in your editor or IDE, add a file named ‘Dockerfile’ to the root of the project and make sure it reads like this:
FROM rust:1.72-buster AS builder
WORKDIR /app
COPY . .
RUN cargo install --path .


FROM debian:bullseye as runner
RUN apt-get update \
     && apt-get -y install libpq-dev gcc
EXPOSE 8080
COPY --from=builder /app/target/release/eventsapi /app/target/release/eventsapi
COPY migrations /app/target/release/migrations
CMD ["/app/target/release/eventsapi"]
I will not go into defails, suffice to say that we use a rust image to build our application and then use a very small Debian (Linux) image to install that application on. Since we only have one binary that is all we need.
Also we need to copy the migrations directory to the target directory, so the app can do the migrations automatically.
Also in the root of your project create a ‘.dockerignore’ file which will prevent unneeded files from ending up in your docker image:
**/target/
Dockerfile
.env
**/kubernetes/
**/.github/
**/.idea/
**/.vscode/
Now in your terminal type:
docker build -t <your dockerhub username>/eventsrust:latest .
Make sure you have Docker desktop or at least the Docker daemon running. This command will build the docker image. Do not worry if this takes several minutes.
Once this is finished type:
docker loginThat will log you in to the docker hub and then:
docker push <your dockerhub username>/eventsrust:latestThis will push your image to the Docker hub for later use.
Deploying to Kubernetes
If your image has been succesfully deployed to the Docker hub, we can start working on deploying it to Kubernetes. For the sake of simplicity I assume you have Minikub or another local Kubernetes cluster running.
Starting Minikube
If you want to start Minikube, in your terminal type:
minikube startAnother handy feature of Minikube is its dashboard. In a new terminal type:
minikube dashboard
We will use YAML-files to configure our Kubernetes cluster. Create a directory ‘kubernetes’ in the root directory of the project to put them in.
The configmap
We will start with an easy one: the configmap. This resource stores key-value pairs which can be used as environment variables. In your kubernetes folder create a file called ‘db-configmap.yaml’:
apiVersion: v1
kind: ConfigMap
metadata:
  name: db-secret-credentials
  labels:
    app: postgresdb
data:
  POSTGRES_DB: "webevents"
  POSTGRES_USER: "testUser"
  POSTGRES_PASSWORD: "testPassword"
  HOST: "postgresdb.default"
  PORT: "5432"
  DATABASE_URL: "postgres://testUser:testPassword@postgresdb.default:5432/webevents"
Without going in too much detail, you can see the key value pairs in the data-section. In production you probably use secrets but I wanted to keep things simple for now.
Now change directory to your kubernetes directory in your terminal and type:
kubectl apply -f db-configmap.yamlThe storage
The database will be needing some storage to store its data. For that we need a persistent volume and a persistent volume claim.
We will start with the persisten volume:
apiVersion: v1
kind: PersistentVolume
metadata:
  name: postgresdb-pv
  labels:
    type: local
    app: postgresdb
spec:
  storageClassName: manual
  capacity:
    storage: 8Gi
  accessModes:
    - ReadWriteMany
  hostPath:
    path: "/data/db"
Again not going into much detail:
- The name is postgresdb-pv which will we need later
- We are using hostPath for simplicity, as it works on the node’s filesystem
- The volume is 8Gb, which should be more than sufficient.
Now we also need a Persistent Volume Claim. Create a file called db-persistent-volume-claim.yaml in your kubernetes directory:
apiVersion: v1
kind: PersistentVolumeClaim
metadata:
  name: db-persistent-pvc
spec:
  storageClassName: manual
  accessModes:
    - ReadWriteMany
  resources:
    requests:
      # the PVC storage
      storage: 8Gi
Suffice to say this claims a persistent volume with specified specs, like being 8Gb or bigger and having storageclass manual.
Now in your terminal type:
kubectl apply -f db-persistent-volume.yaml
kubectl apply -f db-persistent-volume-claim.yaml
And your volumes are deployed.
The database deployment
We also need to deploy a pod with the database itself. In your kubernetes directory create a file called db-deployment.yaml:
apiVersion: apps/v1
kind: Deployment
metadata:
  name: postgresdb
spec:
  replicas: 1
  selector:
    matchLabels:
      app: postgresdb
  template:
    metadata:
      labels:
        app: postgresdb
    spec:
      containers:
        - name: postgresdb
          image: postgres
          ports:
            - containerPort: 5432
          envFrom:
            - configMapRef:
                name: db-secret-credentials
          volumeMounts:
            - mountPath: /var/lib/postgres/data
              name: db-data
      volumes:
        - name: db-data
          persistentVolumeClaim:
            claimName: db-persistent-pvc
Here we deploy the postgres database itself. A few things to note:
- The environment variables (in the envFrom tag) are pulled from the configmap
- The volume is using the persistent volume claim
- And for the record: /var/lib/postgres/data is the standard location for the Postgres datafiles.
Save this file and in your terminal type:
kubectl apply -f db-deployment.yamlThe database service
The web app needs to be able to access the database, in Kubernetes we use a service resource for that. In your kubernetes directory create a file called ‘db-service.yaml’:
apiVersion: v1
kind: Service
metadata:
  name: postgresdb
  labels:
    app: postgresdb
spec:
  ports:
    - port: 5432
  selector:
    app: postgresdb
There are two things to note here:
- The selector, which is ‘app:postgresdb’. That is how this service is connected to the deployment
- And no ‘type’ like ‘LoadBalancer’. We want this database to not be directly reachable from the outside, hence no type. That way it is only reachable within the pod.
In your terminal type:
kubectl apply -f db-service.yamlThe web app
Now we can safely deploy the web-app. In your kubernetes directory create a file called ‘web-deployment.yaml’:
apiVersion: apps/v1
kind: Deployment
metadata:
  name: web-deployment
spec:
  replicas: 1
  selector:
    matchLabels:
      app: web
  template:
    metadata:
      labels:
        app: web
    spec:
      containers:
        - name: web
          image: <your docker username>/eventsrust:latest
          imagePullPolicy: IfNotPresent

          env:
            - name: "DATABASE_URL"
              valueFrom:
                configMapKeyRef:
                  key: DATABASE_URL
                  name: db-secret-credentials
Some notes:
- Note the image name in the containers, make sure that is the same as the one you pushed to the Docker hub.
- We see here another way to get our environment variable, DATABASE_URL in this case from a ConfigMap. Again, in production you would probably use secrets.
In your terminal type:
kubectl apply -f web-deployment.yamlCreating the web container can take some time, as Kubernetes will need to pull it from the hub.
If you are using the minikube dashboard you should see the deployment in green, otherwise type:
kubectl get deploymentsAnd you should see something like this:
NAME             READY   UP-TO-DATE   AVAILABLE   AGE
postgresdb       1/1     1            1           8h
web-deployment   1/1     1            1           6m31s
The Web service
To make this API accessible to the outside world, we need a Kubernetes service. In your kubernetes directory, create a file called ‘web-service.yaml’:
apiVersion: v1
kind: Service
metadata:
  name: web-service
spec:
  selector:
    app: web
  ports:
    - protocol: TCP
      port: 80
      targetPort: 8080
  type: LoadBalancer
Two notes here:
- Note the selector: ‘app:web’. That is used to ‘connect’ the service to the deployment
- The type is ‘LoadBalancer’ which makes it possible to reach this from the outside, unlike the database for example.
In your terminal type:
kubectl apply -f web-service.yamlTesting it
There are two ways to test this, for both I would recommend using Postman
Testing without minikube
In your terminal type:
kubectl get servicesAnd you will get back something like this:
NAME          TYPE           CLUSTER-IP     EXTERNAL-IP   PORT(S)        AGE
kubernetes    ClusterIP      10.96.0.1      <none>        443/TCP        59d
postgresdb    ClusterIP      10.96.36.246   <none>        5432/TCP       8h
web-service   LoadBalancer   10.110.47.71   <pending>     80:32398/TCP   27m
Note the external IP address and save it somewhere.
Testing with minikube
In a new terminal type:
minikube service web-serviceThis will produce something like:
|-----------|-------------|-------------|---------------------------|
| NAMESPACE |    NAME     | TARGET PORT |            URL            |
|-----------|-------------|-------------|---------------------------|
| default   | web-service |          80 | http://192.168.49.2:32398 |
|-----------|-------------|-------------|---------------------------|
🏃  Starting tunnel for service web-service.
|-----------|-------------|-------------|------------------------|
| NAMESPACE |    NAME     | TARGET PORT |          URL           |
|-----------|-------------|-------------|------------------------|
| default   | web-service |             | http://127.0.0.1:56190 |
|-----------|-------------|-------------|------------------------|
🎉  Opening service default/web-service in default browser...
❗  Because you are using a Docker driver on windows, the terminal needs to be open to run it.
Note the second URL, in this case the one with portnumber 56190.
Putting it through the test in Postman
For the rest of this post I assume you have Postman installed, although all of these tests can be done using curl.
Try using the url: <url with port from minikube or url from external IP address with port>/api/events. If things went right you have an empty array ‘[]’
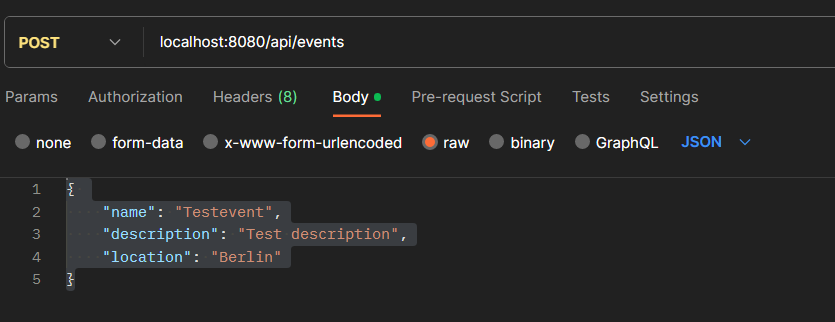
Now try the following:
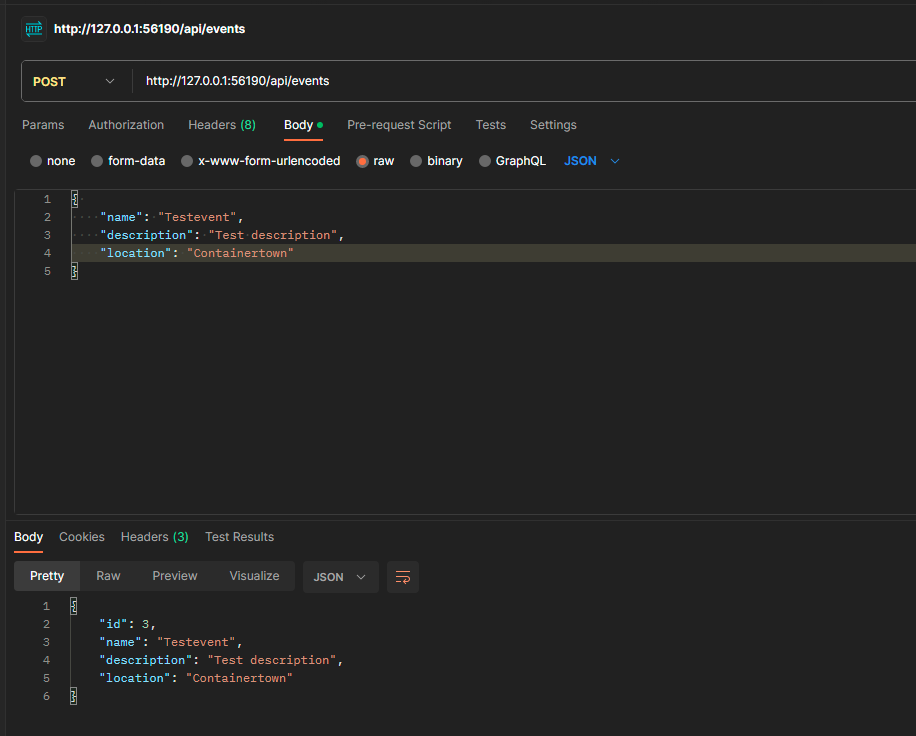
And press send, you should get your event back with an ID.
Now try the first URL and you should see an array with one element.
Congratulations! You have deployed a Rust web app, with Actix and Diesel, including automatic migrations to Kubernetes.
Conclusion
Although Rust is a great language to work with I found that my relative inexperience both with Rust, the two frameworks and with Docker/Kubernetes, held me back. Writing these two blogs literally took me a month (well not continuously, I have a normal day jobs as well, but still)
The language had a lot of quirks. However: once you get over these, Rust is a joy to work with. The learning curve is quite steep in my opinion but well worth taking.
What I also found is that coming from an ASP.NET Core background, I think that both Diesel and Actix will take some time to really mature.
Also I hope that either Microsoft or Jetbrains will produce a dedicated Rust IDE. Visual Studio Code en IntelliJ are great tools, but a dedicated Rust IDE would still be great to deliver a good Developer Experience.